

Setting up a .NET 5 web API + Running it in Docker // for beginners
I'm a software engineer who loves coding and learning about new tech. I have a few years of professional experience primarily in C#/ .NET and JavaScript. I enjoy sharing my experiences so others and I can benefit.
Hey there! 👋🏼
In this tutorial, we'll be setting up a .NET 5 web API and running it locally, then we'll take a look at how to build and run it inside of a Docker container.
To set up the project, we'll be using the dotnet CLI -- which is cross-platform and is included with .NET 5 SDK!
Why web API?
The .NET team has provided multiple useful templates that can be used when creating a project. Whenever you choose one of them, they set up the project skeleton pre-made to include commonly used packages and folder structure (this is called scaffolding).
We're using the webapi template to help scaffold our project. The web API template is a great starting point for building out a standard API because it sets you up with a common folder structure.
It also doesn't bloat your project with any extra packages, other than Swashbuckle.AspNetCore for Swagger support.
We'll be using Swagger to see if our API is running locally.
Prerequisites
Once the .NET 5 SDK and Docker are installed, you should be able to use the CLI commands.
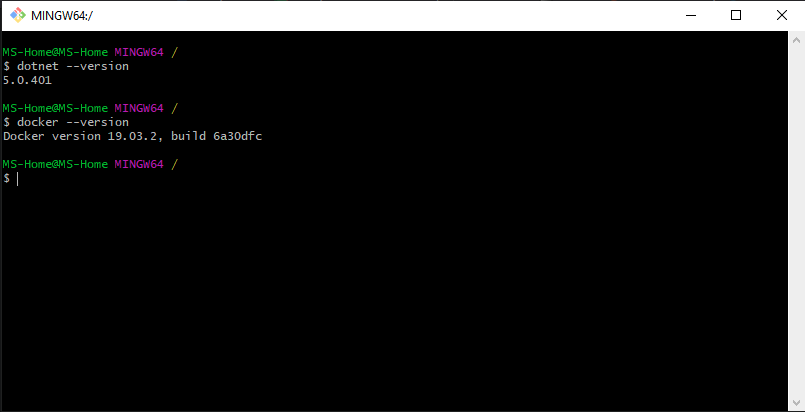
To check, you can run these:
dotnet --version
docker --version
If those return the version, you should be ready to go!
If you see an error message saying your system doesn't recognize dotnet or docker, make sure it's installed properly for your system. You may need to refresh your terminal so it has access to the command line PATH.
Running the project locally
Let's run dotnet new webapi -o <folder>. The folder is what you want your project to be called; mine is called AdventureWorks.Api. Feel free to use that 👍🏼
dotnet new webapi -o AdventureWorks.Api
After a few seconds, the project should be created and all set!
To test out the project and see it in action, in the project folder run:
dotnet run -p AdventureWorks.Api
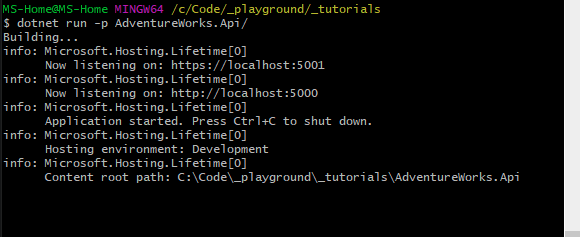
This will build out the project and start a local development server on your computer on (by default) port 5001. Let's check it out by going here:
https://localhost:5001/swagger

Cool, the API is up and running locally!
Running the project in a Docker container
We'll now go over how to run the project within Docker. The difference here is that we'll set up instructions for Docker to do the work of:
- building the project - gathering dependencies and compiling
- publishing the project - preparing and optimizing it for "release"
- creating the running docker container - contains the running web API project
The reason all these steps are used, instead of the steps used to run it locally, is that this is how you'd bundle a typical project in .NET for production. Meaning this way of building the docker image, and running a container based on that image, is optimized and ready to be shipped to users.
This docker build can be used to build out projects for real-world use!
Let's try it
Create a file, called Dockerfile, which will contain the Docker build instructions.
Then paste the following:
# Base image used to create the final image
FROM mcr.microsoft.com/dotnet/aspnet:5.0 AS base
WORKDIR /app
EXPOSE 80

# Build image which builds the project and prepares the assets for publishing
FROM mcr.microsoft.com/dotnet/sdk:5.0 AS build
WORKDIR /src
COPY ["AdventureWorks.Api.csproj", ""]
RUN dotnet restore "./AdventureWorks.Api.csproj"
COPY . .
WORKDIR "/src/."
RUN dotnet build "./AdventureWorks.Api.csproj" -c Release -o /app/build

# Publish image which sets up the optimized version of the app into a folder
FROM build AS publish
RUN dotnet publish "./AdventureWorks.Api.csproj" -c Release -o /app/publish

# Final image which only contains the published content of the project
# This is where the resulting files of the published app are moved to
FROM base AS final
WORKDIR /app
COPY --from=publish /app/publish .
ENTRYPOINT ["dotnet", "AdventureWorks.Api.dll"]
Note: There are comments included for each segment so we can understand what Docker is doing in each step.
This Dockerfile now contains all the necessary steps for building out the image which will be used to run the app in a container. To build the docker image using the Dockerfile, within the project folder run:
docker build -t adventureworks.api .
Breakdown:
docker build- Used for building docker images from Dockerfiles-t adventureworks.api- This adds a tag name to the imageadventureworks.api.- This is saying the Dockerfile is located here
After loading and going through the steps, docker should have downloaded all required dependencies and followed the steps within the Dockerfile.
There should now be an image created with a repository named adventureworks.api.

This is great, this is the final image that we're after which uses as little space possible. Running a container based on this image should be the published version of the app!
To run this image, run:
docker run -p 5151:80 adventureworks.api
Breakdown:
docker run- Used for running a process in an isolated container-p 5151:80- Tells docker to map our local port 5151 to port 80 within the container (which is exposed during the build process in our Dockerfile!)adventureworks.api- The target image to use as a blueprint for the created container
Note: You may have noticed we're now using port 5151 this time. This is to help us distinguish local, or container, by having them on different ports!
You should see something like this:
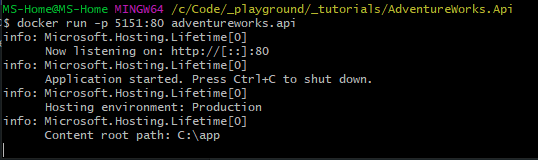
The app is now up and running within a docker container! 🎊🎉
To check out the app running in the docker container, we actually can't use the swagger page like before because this app is a release version. Swagger is set up in the Startup.cs file to only run in development mode!
We can see the app running by navigating to:
http://localhost:5151/weatherforecast

Note: It's using http:// because the app hasn't been set up to use https:// in the container.
If you've followed along this far and see the data from that endpoint, congrats! You've successfully run the API in a container! 😎
Closing thoughts
Thank you so much for coming this far in this tutorial! 😀
To recap, we've:
- built a simple .NET 5 app and ran it locally
- ran the app within a docker container
If you're new to Docker, be sure to clean up any unused containers, images, and resources that you no longer need (if you want to free up storage space). You can learn more about that using the official docs.
I hope you've enjoyed this tutorial or found it helpful. If you did, please let me know. Feedback and comments are welcome!
You can get in touch with me on Twitter. Follow if you'd like to see more content like this, your support is greatly appreciated! 🔥
I'd love to hear your thoughts. ✌🏼
Resources
- https://docs.microsoft.com/en-us/dotnet/core/docker/build-container?tabs=windows